January 22, 2012

The Letters/Invitations--How to Stain Your Paper tutorial

There are six parts to this post, although I've split them up for ease of reading. This is the fifth post.


Table of Contents:


5. How to stain your paper
 

TUTORIAL FOR STAINING THE PAPER:

Items needed:
-Paper (NOTE: You should have already printed on the paper, as it is very unwise to print on the paper after it has been coloured. If you have an ink printer the ink will likely run. It is recommended that you use a laserjet printer for this activity)
-Tea (the kind does not matter but a brown or orange tea is preferable because this is the colour your paper will turn)
-Instant Coffee (optional, but adds a cool effect)
-Cookie trays/jelly roll pans (15"x1"x10" pan. Although any oven-safe pan that fits a piece of paper onto it should be fine)
-Newspaper or rags to put the paper on afterwards to dry
-Heavy flat objects to put on the paper afterwards to flatten it

Directions:
  • Make a pot of tea. After it is done brewing I prefer putting it into bowls because you'll be scooping it on and off of the cookie trays.
  • Heat your oven to 200 degrees Fahrenheit. While it is warming up put the paper on the cookie sheet and spoon the tea over it. The tea can be hot or cold, but it stains better warm (I'm telling this so you know that you can store it in a container if you want and finish staining later or something). Try to cover the whole paper with tea.
  • Crush some of the instant coffee and sprinkle it over the paper. Allow it to clump in some areas -- this stains the paper darker in that area and makes for a neat effect.
  • Let the instant coffee sit on the paper for 1-2 minutes, then flip it over and repeat with the spooning of the tea and the sprinkling of the instant coffee on the other side
  • Take the paper off the pan and drain the tea back into the bowl. You might also want to dry the pan with a rag before the next step to prevent stains (recommended to use an older cookie tray for that reason)
  • Put the paper printed (ink) side up back onto the cookie tray and bake it in the oven for 5-8 minutes (depending on how long it takes the paper to dry)
  • Remove the paper from the oven and put on newspaper with books on top to flatten it out
  • Tadaa! Some people might also recommend burning the edges, but we didn't do that. We thought it looked old enough without the burning.
Other mentionable information:
  • The tea will gradually get darker with each paper you stain due to the coffee granules, so you might want to replace it now and then
  • If you want a darker stain, use brewed coffee instead of the tea
  • You don't have to let the coffee granules sit on the paper, but they soak in better if you do (this is if you're strapped for time)
  • You can store the tea in a container and use it to stain paper later on
  • You might want to have two or three cookie trays of these sheets going at once so that you will always have another piece of paper ready to put in after one finishes baking (we rotated two in and out of the oven, i.e. one was in the oven while we prepared the second one)
**If you came here from the Marauder's Map post, you can use the link to return**

You can also stain the envelopes, if you wish. We did the inner envelopes only because I'm sure the people mailing your letters wouldn't be impressed with the stained envelope, should it be on the outside.
Our advice for staining the envelopes is as such:

1.    Print on the envelope FIRST, UNLESS you don't have an envelope-compatible printer, in which case you will have to stain the envelope and then write on it by hand
2.    Leave the flap of the envelope open so that it does not stick down to the rest of the letter while baking (although it may stick to the pan, which is why it is important to use an older pan! If you soak it in a bit of water it comes off)
3.    Put the envelope ink side-up, unless you are writing on it by hand after it has been stained. If the ink has gone on first, however, ink side MUST go up otherwise it may stick to the bottom of the pan and come off.
4.    Envelopes take a bit longer to dry in the oven -- probably more like 6-10 minutes

I hope that this helps you!

The Acceptance letters, Equipment letters, and Platform 9 3/4 tickets went inside the stained inner envelopes. We stained the Acceptance letters and the Equipment letters and also many other things, such as the papers that went into the Goblet of Fire and our Marauder's Maps.


>>Link to Table of Contents

The Letters/Invitations--Outer Envelope

There are six parts to this post, although I've split them up for ease of reading. This is the fourth post.


Then we had an 'outer envelope' which contained a map to the location of the party and a "Hogsmeade Permission form". Mostly what was in the permission form was just information about the party that hadn't been included or might not have been clear in the invitations (because we were trying to make them replicas). The permission form noted different ways to RSVP and also told parents about what was going on i.e. there would be food and drinks available, it would be for ____ days, and that there would be adults present during the festivities. We also asked people for a donation of $15-$20 when they come to the party to cover costs. (We said that this is like our Christmas gift to the guests and their Chrismas gift back is the donation of money).

The outer envelope was NOT stained (the tutorial for staining paper can be found by clicking the link in the Table of Contents) because it was the one that would be going in the mail.

The outer envelopes looked like this:
The addresses have been blocked out, but here is a picture of some of the outer envelopes,
which we customized by giving everyone a different owl.


Here is one of the owls we used, which you can save as a picture
and write the address on by hand if you like.
Because mail is delivered by owls in the wizarding world, on the outer envelope we featured a picture of an owl holding a letter in its beak. Each person received a different owl, and not all of the envelopes were shown here. However, it is likely more convenient for you to just use the same owl for everyone. Comment if you want me to link MediaFire files to the files in Photoshop so you just have to change the text (provided you have Photoshop Elements 7 or better).


>>Link to Table of Contents

The Letters/Invitations--Inner Envelope

There are six parts to this post, although I've split them up for ease of reading. This is the third post.


There was the first, or the 'inner' envelope. It had the guest's address written out like Harry's was in the book to make it more special. I used "Tall Paul" font and made it green as was specified in the book. I wrote it like Harry's is written, i.e.

Mr. H. Potter (name)
Cupboard Under the Stairs (location of room)
4 Privet Drive (Street address)
Little Whinging (Town/city)
Surrey (State/Province/Territory etc)


Here is a picture of one of the completed envelopes
(The address is blocked out).
We printed the addresses directly onto the envelopes and then stained them. We stained the envelopes in the same way that we stained all of our other things. The tutorial for that is in another post. 

Here is the back of the Inner Envelope with the Hogwarts wax seal on it.
Here's a link to the tutorial for the wax seal,
which is in another post.
Inside of the Inner Envelope was the Platform 9 3/4 ticket, the Hogwarts Acceptance Letter, and the Hogwarts Equipment list. The links to those tutorials and instructions are below and also linked on the Table of Contents:

The Letters/Invitations--Platform 9 3/4 Ticket

There are six parts to this post, although I've split them up for ease of reading. This is the second post.

Table of Contents:
 
 
2. Platform 9 3/4 tickets


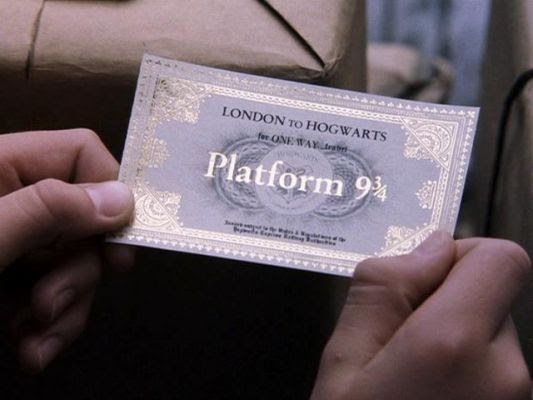
The other thing that we did was made Platform 9 3/4 tickets for guests to inform them of the time they had to be at the party by (in this case, 11:00am because the 'train' leaves then). This ticket was made by FlightlessPhoenix (me; I write most of the blog posts) entirely from scratch in Photoshop Elements, and it is as close to the one shown in the first movie as I could make it. If you have gold foil and you want to use that go ahead, but as we wanted ours to be low-cost we omitted this and simply had a black border in place of the shiny gold one.

This is a close up of the ticket from the movie, however,
you can see that it is a bit curved and not suitable for printing.
This is the version that I got the colours from. I found it
at Curiousgoods.com, and I think that occasionally
they put some tickets on sale. Ours looks quite similar to this,
however where they used gold foiling I simply
made it black.

This is the version of the Platform 9 3/4 ticket that I made.
You can save it as a picture and print off as many as you
like, but if anyone asks where you got it, please give
me credit ;)


This is a screenshot of the Platform 9 3 4 ticket in Harry's hands.

 I am quite proud of the ticket, and because it was made from scratch. I have made it available to download as a Photoshop file (I used Adobe Elements 7, but the newest version out is the Adobe Photoshop Elements 10, which you can purchase from the Adobe site. There are also versions of Adobe Photoshop Elements 7 you can buy, and that link there goes to Amazon where you can purchase a used version. If you would like to download the Photoshop file you will find it on my MediaFire account.

Anyways, the ticket went inside the first envelope (there was two) with the acceptance letter and the equipment letter.


**Later Update**
I finally managed to find a suitable, flat, printable ticket inside a Harry Potter book. I immediately scanned it into my computer and voilà! Here is the ticket. Its colouring is different but the style is the same. Of course, you can't edit this one, but if you like the look it's free for printing :)


The golden Platform 9 3/4 ticket I discovered.


>>Back to the Table of Contents

December 24, 2011

The Slytherin Locket

Farther back view of the Slytherin Locket with the corked vial of beads next to it.
Another post, this one on how to make your own Slytherin Locket.
We made this one entirely from scratch, and unfortunately, it does not open like a typical locket. We based it, not off of the one in the movie, but off of this one:
Here is the 'Adult' cover for the seventh and final Harry Potter book.
So if you want to make on as it looks on the movie, you'll have to make up your own alterations.

ITEMS NEEDED:

  • Clay
  • Green beads, sparkles, rhinestones etc.
  • String of any sort; can be plastic, but ought to be wide enough to see. If you wanted to spend a bit more money for a more authentic look you could also purchase a chain at your local craft store.
  • Gold Spray Paint
  • Toothpicks, needles etc. for carving into the clay
  • Wax paper, newspaper etc. for minimizing mess

Directions:

  1. Basically what we did here was we took some of out handy-dandy clay purchased at the dollar store (the kind that does not need baking) and rolled it into an oval. Then I put the clay onto a piece of wax paper and flattened out the back slightly.
  2. Next I smoothed out the clay as much as I could and took a second chunk of clay, which I formed into a small "S". I laid that out over the locket base and smoothed it out again.
  3. After you've smoothed it out you can take your toothpicks, needles, etc. and carve the desired design into the clay. You must also make indents to place the green gems/beads (or whatever you plan to decorate the locket with) into.
  4. When you're happy with how it looks, allow it to dry overnight. Meanwhile, you can make the chain. We just had some white GIMP string lying around (it's just flat plastic 'string') that we used. You'd be all right if you used any sort of string. This is just to make the locket into a necklace. We took three long strands of the white GIMP and spray painted it gold. When it dried we braided it so that it resembled a chain. You could also use an existing necklace chain if you so desired.
  5. When your clay has dried, spray paint it gold as well. Next, to give it that "Slytherin" vibe, we're going to add the green accents. I found these adorable corked bottles of beads at my local dollar store for a dollar and a bit, and they are the perfect shade of dark green. However, rhinestones, glitter, or even just green paint would work just as well.
  6. To get the beads on the locket I took a BBQ skewer and dipped it into some glue, then carefully dabbed it into the hollowed out area for the beads. I put the locket in a container and poured some beads over it, then shook the excess off and put the beads still in the container back into the corked bottle of beads. I had been hoping to find some dark green paint lying around, but no such luck. The only reason I wanted the dark green paint was so that if any of the glue showed through it would look funny, whereas the green would disguise that.

In any case, I did more dabbing and gluing until the locket was finished. Then we let it dry, and our next task is to glue the spray painted GIMP onto the back of it. Excess "chain" could be used to make a time-turner chain.
Here is the final result of the Slytherin locket close-up.
>>Back to the Table of Contents

December 03, 2011

The Letters/Invitations--Acceptance Letters and Equipment List

There are six parts to this post, although I've split them up for ease of reading. This is the first post.

Table of Contents:
 
1. Acceptance letters and Equipment list 


HOGWARTS ACCEPTANCE LETTER

We wanted to make the invitations look as close to the Hogwarts Acceptance letters as possible, and keep the cost as low as possible, so as a result just about everything is handmade. Again, we'll add in alternatives for people to suit the items you have available. I've also uploaded some templates of things at MediaFire.com so that you can alter them to suit your needs.

First off, the from-the-book invitation with the 'acceptance speech' on it. Here's a link to the file on MediaFire.com. It's a Microsoft Word 2007 file. And here's the one we actually sent out, with some different text to explain the party to people. All of the text is in text boxes because I used two different fonts, Edwardian Script ITC and Scriptina Pro. Edwardian Script ITC came with my computer, but I'm sure you can Google it or substitute a different font if you wish. For the Scriptina Pro font, here's the link, I downloaded it at dafont.com. If you're not sure how to install fonts on your computer, all you do is:

  1. Download the font to somewhere on your computer and find it.
  2. Right click the file and click "Extract Here", or "Extract".
  3. You'll probably get some sort of WinZip dialogue. Tell it to extract it onto your computer, preferably the same place you are now.
  4. Another file (or more) should show up now. One of them should say that it's a "TrueFont" file (or something of the sort). You can delete all of the other files except for this one; that's the only one you'll really need.
  5. Go to the start button at the bottom left of your screen and click Start -> Control Panel (for earlier versions it might be Start -> Settings -> Control Panel). I have a Windows Vista, so controls will likely be different for other computers.
  6. In the Control Panel window, find the file labelled "Fonts" (you can search for it with the search box if you like). Open up that folder and you should see a whole bunch of fonts in there that are the same file type as the one that you saved above (after extracting it from the WinZip file).
  7. Find the downloaded font (in this case, Scriptina Pro) and right-click it. Click "Cut".
  8. Go into the Fonts window and right click. Press "Paste".
  9. It should briefly say that it's installing the font onto your computer.
  10. Open up any program and use your new font!
If these instructions are confusing you there's dozens of other ones out there on the internet if you Google it.

All right, if you're wondering about why there is two different fonts, it's because I thought that the Edwardian Script ITC capital letters were too curly and unrealistic (to be handwritten) looking so I found the Scriptina Pro font. However, Scriptina's letters, when all used, look ridiculously curly and are far too distracting. Therefore I made a combination of both, with Scriptina Pro as the capital letters and Edwardian Script ITC for the lowercase letters.

HOGWARTS EQUIPMENT LETTER

When the letters were printed off (and customised with each guest's last name) we made an accompanying "Equipment" letter that detailed the items that guests must bring to the party (i.e. a sleeping bag, and winter clothing for outdoors since some of our activities were taking place outside in the snow). It also mentioned the Dobby's Sock Contest that we held. You can omit the contest or you can put another contest of your liking etc. in there. Here is the link to download the Equipment list on MediaFire.

>>Back to the Table of Contents

November 19, 2011

Snitches -- The Deathly Hallows version with Resurrection Stone

The Deathly Hallows version of the snitch. They turned out really well, everyone was thrilled!


Hello, all!
FlightlessPhoenix and The 5th Marauder here. This is our first post for this blog, and it's on snitches! We're making a few different kinds of snitches, depending on the use.  The first sort of snitch that we made is from the last movie. If you have not read/watched the last book/movie, SPOILER ALERT!

***
***
***
Space to stop
reading if you
don't want to
spoil the book/movie
for yourself 
***
***
***